./ace make:command QuoteYou are viewing the legacy version of AdonisJS. Visit https://adonisjs.com for newer docs. This version will receive security patches until the end of 2021.
Interactive Shell Aka Ace
Ace is a powerful command line tool crafted for AdonisJs. So far you have been using lots of ace commands to generate controllers, models, run migrations, etc. In this guide, we will learn about the internals of Ace and how to create commands.
About Ace
-
aceis an executable file inside the root of your application. -
Each command is specific to a single project, for reusable commands, you must bundle them as an npm package.
-
Commands have access to all the applications components like Models, Routes, etc. That makes it so easy to create useful commands.
-
Project specific commands are stored inside
app/Commandsdirectory. -
You must register your commands inside
bootstrap/app.jsfile before using them.
Creating Your First Command
We are going to create a command to pull random quotes of Paul Graham using Wisdom API and display it on the terminal.
npm i --save gotconst Command = use('Command')
const got = use('got')
class Quote extends Command { (1)
get signature () {
return 'quote'
} (2)
get description () {
return 'Display a random quote from Paul Graham.'
} (3)
* handle (args, options) {
const response = yield got('https://wisdomapi.herokuapp.com/v1/author/paulg/random')
const quote = JSON.parse(response.body)
this.log('\n')
this.log(`${this.colors.gray(quote.author.name)} - ${this.colors.cyan(quote.author.company)}`)
this.log(`${quote.content}`)
} (4)
}| 1 | Each command should be inherited from the base Command class. |
| 2 | The signature is used to define the command name and its expectations. Learn more about Signature here. |
| 3 | Description is displayed on the help screen. It is a good place to tell the end user about the command. |
| 4 | The handle is the body of your command and called automatically by Ace when the command gets executed. |
Next, we need to register this command to the list of commands.
const commands = [
  'App/Commands/Quote',
  ...
]
If all went through, you would be able to see your command listed on the help screen of Ace.
./ace --helpquote Display a random quote from Paul Graham
....Let’s execute this command to fetch an inspirational quote and display it on the terminal.
./ace quote
Command Signature
Command Signature defines the command name with required/optional arguments or options.
Command With Only The Name
get signature () {
  return 'make:controller'
}
Arguments
Commands can recieve named arguments.
Command With Required Argument(s)
Curly braces surround arguments. A single command can have as many arguments as it wants.
get signature () {
  return 'make:controller {name}'
}
Optional Argument(s)
Append ? to the argument, name to make it optional. Just like your route parameters.
get signature () {
  return 'make:controller {name?}'
}
Argument Description
Also, you set a description for an argument separating it with a colon (:).
get signature () {
  return 'make:controller {name:Name of the controller}'
}
Options
Options are defined by appending -- to the start of the option name.
Command With Required Option(s)
get signature () {
  return 'make:controller {name} {--resource}'
}
Optional Option(s)
Just like arguments, you can also make options optional by appending a ?.
get signature () {
  return 'make:controller {name} {--resource?}'
}
Options With Aliases
Often options need aliases like -h for --help. You can define multiple aliases for a given option separated by a comma.
get signature () {
  return 'make:controller {name} {-r,--resource?}'
}
Options That Accepts Values
At times options want values to perform certain operations, and same can get achieved by making use of @value identifier.
get signature () {
  return 'make:controller {name} {--template=@value}'
}
Interactive Inputs
AdonisJs makes it so simple to create interactive commands by prompting the user to give information as they go.
ask(question, [defaultValue])
The ask method will accept textual input. Optionally you can define defaultValue which will be returned when no input has been passed.
const projectName = yield this
  .ask('Enter project name', 'yardstick')
  .print()
choice(question, choices, [defaultChoice])
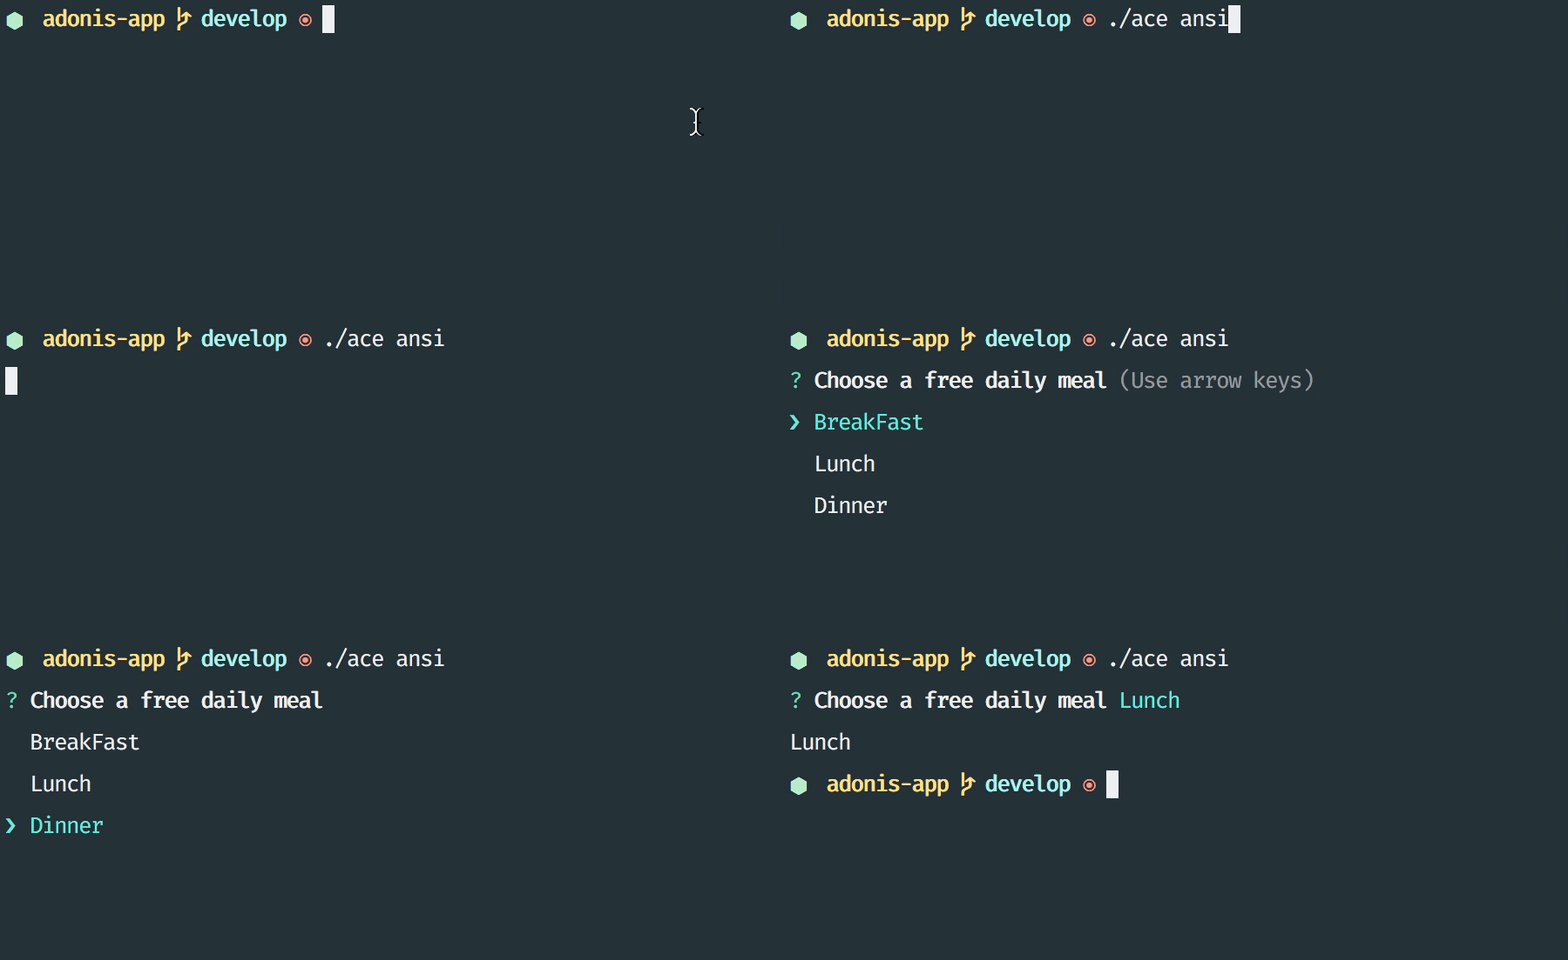
Display a list of choices to be used for selection. Only one of the listed options can be selected.
const dailyMeal = yield this
  .choice('Choose a free daily meal', ['BreakFast', 'Lunch', 'Dinner'], 'BreakFast')
  .print()
multiple(question, choices, [defaultChoices])
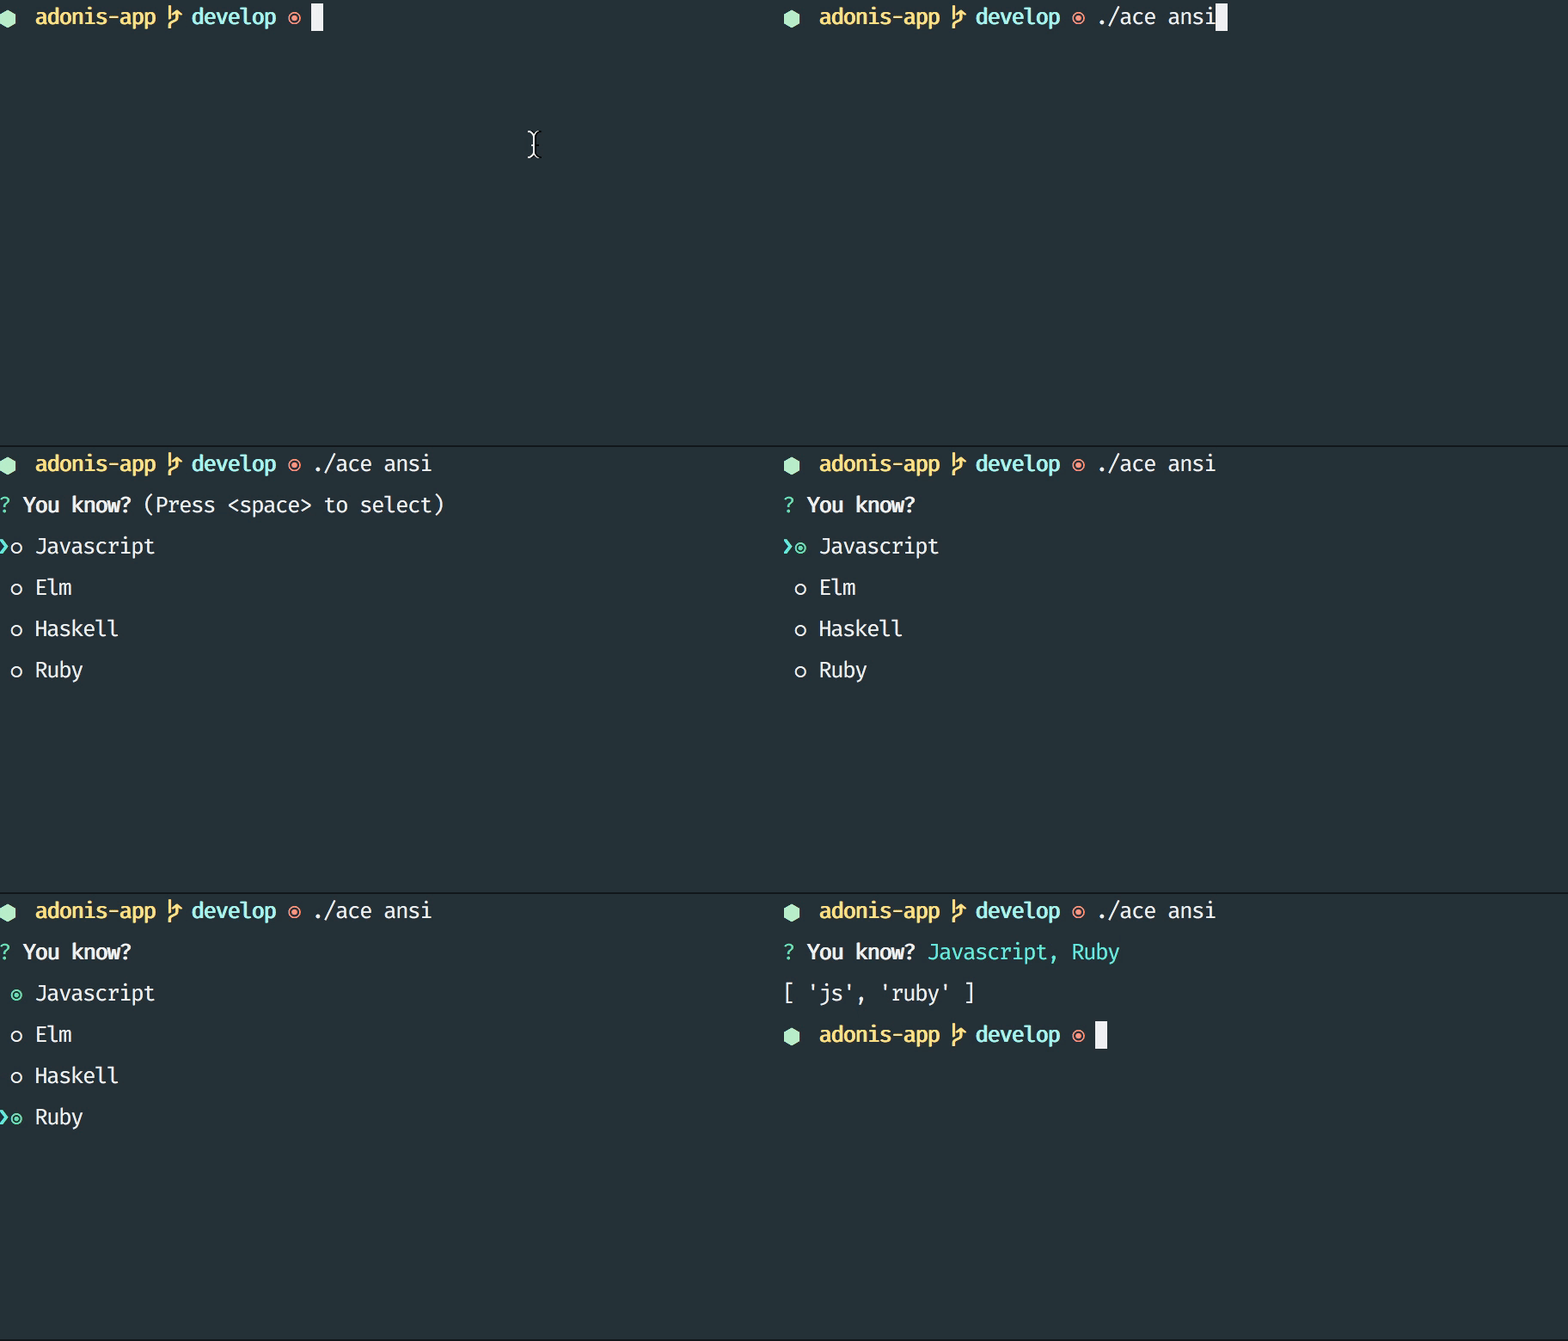
Display a list of multiple choices with an optional array of pre-selected values. Unlike choice you can select multiple values.
yield this.multiple('You know?', ['Javascript', 'Elm', 'Haskell', 'Ruby']).print()

// OR
const langs = yield this
  .multiple('You know?', {
    js: 'Javascript',
    elm: 'Elm',
    hsk: 'Haskell',
    ruby: 'Ruby'
  }).print()
anticipate(question, choices, [defaultChoice])
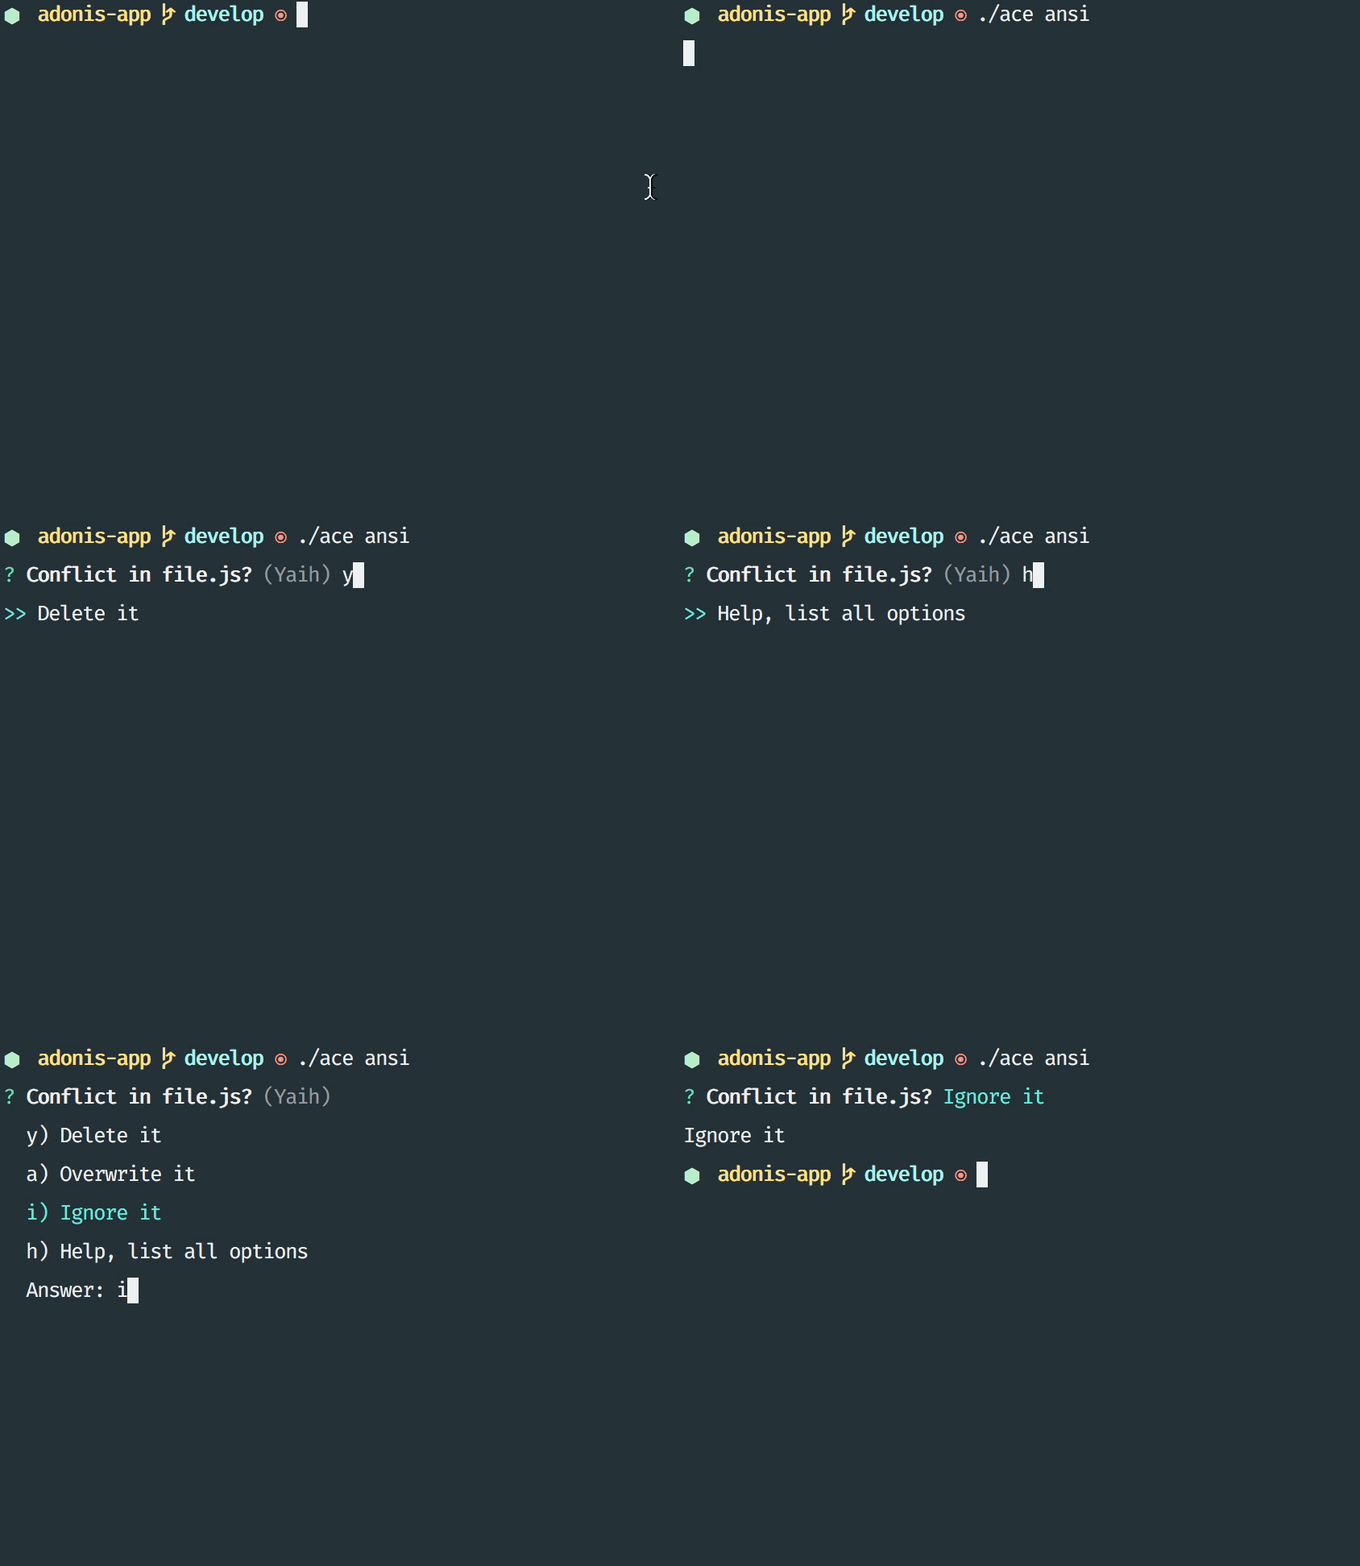
Shows a list of actions with the keyboard shortcuts. It is helpful when you want the user to anticipate on something.
const action = yield this
  .anticipate('Conflict in file.js?', [
    {key: 'y', name: 'Delete it'},
    {key: 'a', name: 'Overwrite it'},
    {key: 'i', name: 'Ignore it'}
  ])
  .print()
secure(question, [defaultValue])
Ask for a secure input like a password or some secret token. The input value will be show as ******.
const password = yield this
  .secure('What is your password?')
  .print()
confirm(question, [defaultValue])
Ask for a yes/no question.
const deleteFiles = yield this
  .confirm('Are you sure you want to delete selected files?')
  .print()
Validating Inputs
It is extremely useful to validate input when accepting the values from interactive questions. All prompt questions can be validated by chaining the validate method and returning true from the callback will be considered as successful validation.
yield this
  .ask('Enter coupon code')
  .validate(function (input) {
    return input === 'adonisjs' ? true : 'Enter a valid coupon code'
  })
  .print()
ANSI Output
Ansi Escape Codes are used to output colored text to the terminal using a sequence of multiple characters. For example: To output a green color Hello World to the terminal you need to log following.
console.log('\033[32m Hello World')It is so hard to remember these codes and unpleasant to write them. Also, you will have to deal with different shell types to get the right output. AdonisJs commands can make this easy with the help of the following methods.
error(message)
this.error('Sorry, something went wrong')success(message)
this.success('All done!')info(message)
this.info('Just letting you know')warn(message)
this.warn('Wait! something seems fishy')completed(action, message)
Will output a structured message for a completed action. Where action name will be in green color.
this.completed('create', 'Created the controller file')create: Created the controller filefailed(action, message)
this.failed('create', 'Sorry controller file already exists')create: Sorry controller file already existstable(head, body)
this.table(['username', 'age'], [{'virk': 26}, {nikk: 25}])

// or
this.table(
  ['key', 'value'],
  {username: 'foo', age: 22, email: 'foo@bar.com'}
)
Icons & Colors
Additionally, you can output icons and add color to your console messages inside your command handle method.
'use strict'

const Command = use('Command')

class Greet extends Command {
  * handle () {
    const successIcon = this.icon('success')
    console.log(`${successIcon} That went great`)
  }
}✔ That went greatIcons List
| Icon | Name |
|---|---|
ℹ |
info |
✔ |
success |
⚠ |
warn |
✖ |
error |